Void A Check In Quickbooks & Learn Why It Is the Best Option?
Recently, I received a query: how to void a check in QuickBooks? Well, that’s easy if you know when and how to do this. This may surprise you, but it’s crucial to understand when before you act upon it.
Many QuickBooks users get confused if they should delete or void the check. Though both these processes are the same, they impact your QuickBooks activity differently.
Let’s understand it this way- when you delete a check from QuickBooks, the entry gets deleted. But, when you void a check-in with QuickBooks, it remains in the records. Except that the value tends to zero. Therefore, it is essential to understand when to delete and when to void the check. Don’t worry! We’ll help you. Also, you’ll learn :
- How to void a check on QuickBooks Desktop?
- How to void a check in QuickBooks online?
Without further ado, let’s get started!
What Exactly Does “Voiding A Check” in Quickbooks Mean?
When you void a check, you’re removing its value from the records. Similar to a physical check, the number of checks remains in the record. Thus, if you ever search for the check, you’ll learn that it was void. But, when you delete a check, the check number also gets deleted.
How does it cause a risk for you?
It’s obvious that when you delete a check, it’ll be removed completely. You’ll not find this check number in QuickBooks records. This is where the risk is.
Someone may forge a check using the deleted check number. Consequently, it’ll create an invalid entry in your record, and catching this fraud won’t be easy.
On the other hand, when you void a check:
- You’ll be saved from getting forged.
- Can retrieve the details of the void check anytime.
- Have all the check numbers available in your book.
When should I delete a Check-in QuickBooks?
The rule is simple – when you have a duplicate entry in QuickBooks. Deleting is the best option rather than voiding the check.
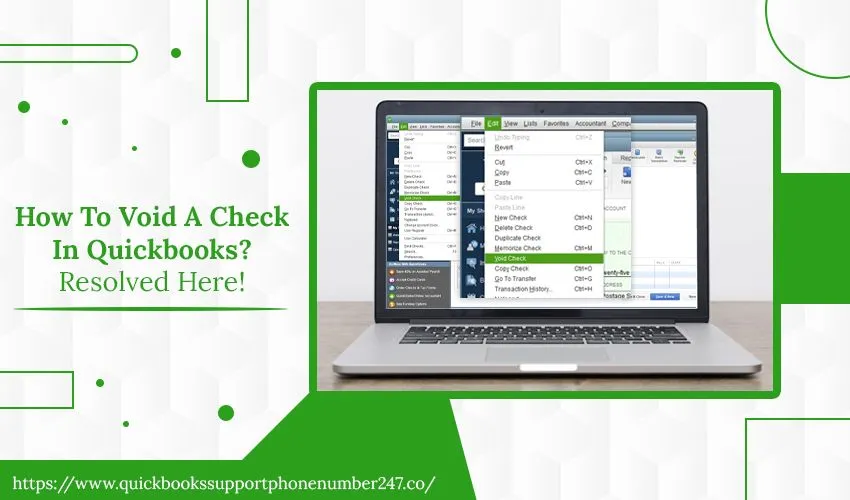
How to Void a Check in QuickBooks?
The requirement to delete or void a check comes when you want to cancel the check or reverse the deducted amount. In that case, you can read this section and learn- how to void a check on QuickBooks desktop and online.
There are three major steps to voiding a check-in QuickBooks:
Step 1: Select the Check Register
- Open your QuickBooks desktop home page.
- Navigate to the Banking menu.
- Then, select the option “Check Register.”
- Moving forward, tap on the Banking menu from the top bar.
- Then, choose Use Register from the drop-down list.
Step 2: Choose a Check to Void in QuickBooks
- Now, from the drop-down list, choose the bank account.
- A window of checks will open.
- Double click on the check you want to void.
Step 3: At Last, Void the Check
Once you select the check, it will open up in a new window. From here,
- Select the Delete menu from the check window.
- From here, tap on the small drop-down arrow.
- Then, select Void.
- As you tap Void, the amount for the check will turn zero.
- Also, in the memo field, you’ll notice VOID written there.
- After that, tap on the Save & Close button.
- It’ll ask you to confirm the changes. Click “Yes” to proceed.
How to Void a Check in QuickBooks Online?
Voiding a check-in QuickBooks online is much easier. It manages your profit and loss statement and checks the register accurately. Apart from that, if you use the QuickBooks Desktop online account feature; it ensures your A/P is always accurate.
Let’s understand how to void a check in QuickBooks online- 1. Check already recorded 2. Not previously entered.
Also Read: QuickBooks Password Reset Tool
Void a Check Already Recorded:
- On your QuickBooks accountant home screen,
- Tap on the “New” button.
- Then, select a check under Vendors.
- Create a Check:
- Fill in the payee name
- The date on which the check was written
- Check number (Please ensure you’ve selected the correct check)
- Bank account
- Category (can’t be left blank)
- Amount $0.00
- mention voided check
- Tap the Save & Close button.
- Now, review your check register.
See if it shows the amount of zero and checks voided.
Void a Check from the Prior Accounting Period
You can follow this approach to void a check from previous records. But, it’s not useful for a previous month’s record. In fact, you need to use it with a prior-year record.
It will help you with your closed books and maintain bookkeeping accuracy.
-
- First, create a deposit to offset the check to be voided.
- Tap on the “New” button.
- Then, select Bank Deposit from the Other list.
- Now, fill out the Bank Deposit form:
- Bank account
- Date in the current accounting year
- Received from: enter the vendor’s name
- Use the same account you used in the check
- mention voided check, check number
- The amount of the original check
- Payment method and Ref no (both are optional)
- Then, tap on the Save button.
- Now, mark to reconcile both the check and deposit.
Please Note: you need to create a new bill for any voided check that was used to pay a bill and is still due. Do that in the current accounting year.
Some important tips:
Voiding a check-in QuickBooks is easy as it’ll maintain your QuickBooks records. However, we’ll suggest you note the void entries within your accounting system. So you can catch up on the details just by entering the check numbers.
Winding Up the Guide
Here, you have learned –how to void a check in QuickBooks. The process is easy and simple to apply. You can use this guide whenever you make a mistake or fill in an incorrect entry. But, if the entry is duplicate, delete it. Nonetheless, if you face any issues, don’t worry! Our experts are always ready to assist you.