Fix QuickBooks Error 15222 – Get Quick and Easy Solution

 QuickBooks Error 15222 encounters when users try to download the QuickBooks Payroll update or QuickBooks failed to verify the digital signature within the update file. If you come across error code 15222 in QuickBooks, then perform the steps given below for an instant solution. In case you need technical guidance, Contact QuickBooks Support. Experts will help you out to solve your problem and offer you the best solution.
Causes of QuickBooks Update Error 15222
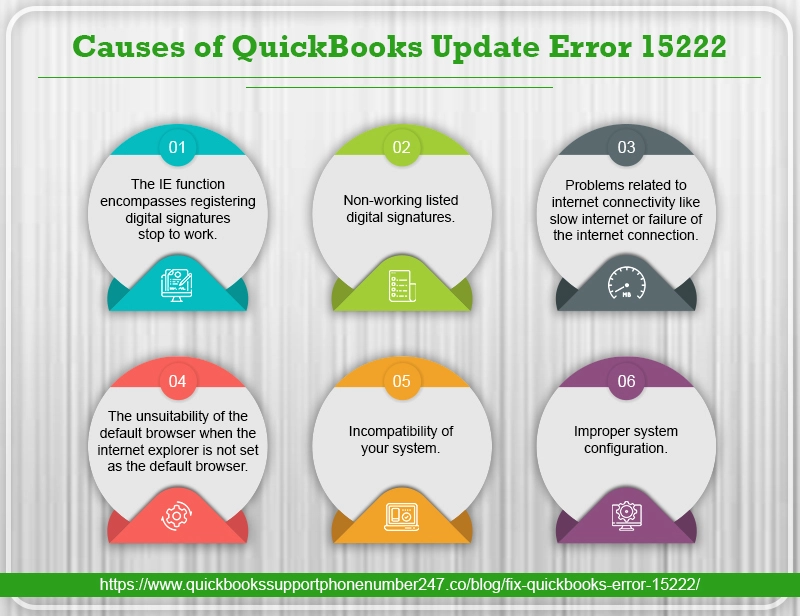
- The IE function encompasses registering digital signatures stop to work.
- Non-working listed digital signatures.
- Problems related to internet connectivity like slow internet or failure of the internet connection.
- The unsuitability of the default browser when the internet explorer is not set as the default browser.
- Incompatibility of your system.
- Improper system configuration.
What are the symptoms of QuickBooks Error 15222?
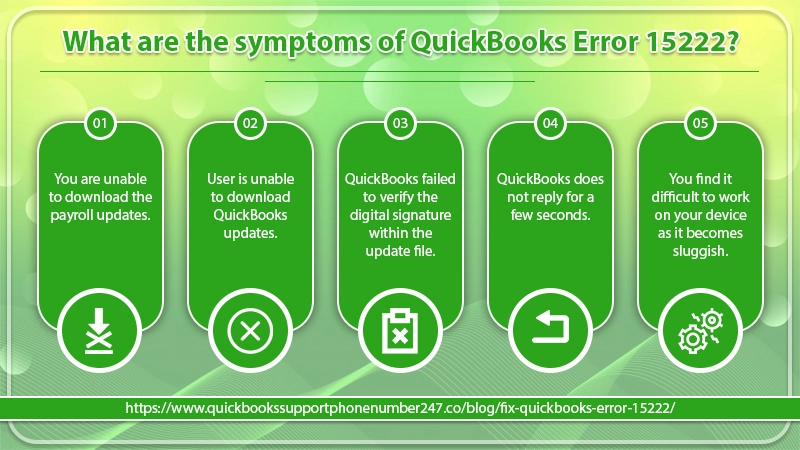
- You are unable to download the payroll updates.
- The user is unable to download QuickBooks updates.
- QuickBooks failed to verify the digital signature within the update file.
- QuickBooks does not reply for a few seconds.
- You find it difficult to work on your device as it becomes sluggish.
Steps to resolve QuickBooks Error 15222?
Given below are some of the fixes that can be applied to resolve the error 15222. You can perform these simple steps to get hassle-free usage of this application.
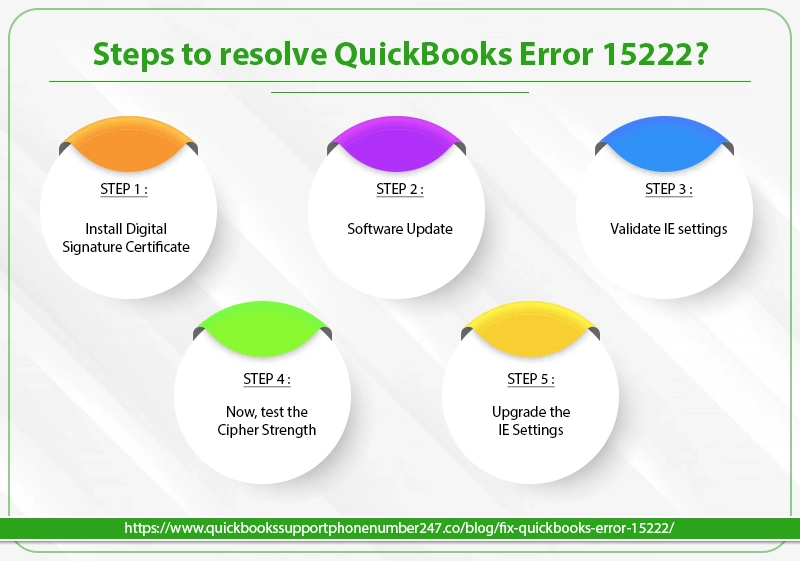
Step 1: Install Digital Signature Certificate
- To get your Digital Signature tab, at first, close QuickBooks Desktop, select the “Properties” option after right on QBW32.exe.
- Choose the Digital Signature tab by selecting Intuit Inc. in the list of signatures.
- Select the “Details” option and in the Digital Signature details, choose the option “View certificate”.
- In the certificate window, tap on the “Install certificate” option and then hit on the “Next” button.
- A “finish” menu will appear on the screen, hit on it to finish the installation.
- After performing this whole procedure, start your system again and open and download the QuickBooks update again.
Step 2: Software Update
If you have antivirus software, antimalware or antispyware, then you need to update these programs so that the given exceptions can work –
- Processes – qbupdate.exeandqbw32.exe
- Domains – QuickBooks.com, Intuit.com, and Payroll.com
When you finish updating the software, check if the QuickBooks payroll error 15222 is appearing or not.
Step 3: Validate IE settings
- First of all, examine if IE is the default browser, if not, then make it.
- Ensure the time of your PC is correct –
- Double-click on the time that is at the right bottom of the screen.
- A window with the name having Date and Time Settings will open up. Test if the current date and time are correct or not. If not, change them if needed.
- Select the zone.
- Take into account that you have to make sure that the date and time there are correct if the device is on a network.
Step 4: Now, test the Cipher Strength
- Go to https://www.intuit.com/.
- On the menu bar, select the “File” option and then choose “Properties”.
- Launch the Connection and search the number written before the bit encryption.
- If the cipher strength is less than 128 bits, it indicates damaged IE, and thus, the QB process may not work as it should.
Step 5: Upgrade the IE Settings
- At first, go to the “Tools” option.
- Go to Internet Options.
- Open the tab named General and select the “Delete” option. Delete all the Temporary Internet files, excluding cookies.
- Launch the tab named Connections. Select the LAN settings.
- Put a checkmark against the Automatically Detect Settings.
- If you do not access Proxy servers, make sure they are blank.
- Click on the “Ok” option and go to the named Advanced.
- Put a checkmark against SSL 2.0 and SSL 3.0.
- Ensure that there should be no checkmark against the Check for publisher’s certificate. If there is, uncheck it.
- On the same Advanced tab, go downwards towards the bottom and ensure:
- There must be a checkmark against TLS 1.2. If not, then put it.
- There should be no checkmarks against TLS 1.0 and TLS 1.1. If marked, you have to remove the checkboxes.
READ MORE- Common QuickBooks Payroll Problems and their Solutions
For technical support, dial the QuickBooks Support Phone Number and get the instant solution for your problem. You can call 24*7 to avail of the benefits.