How to Use and Enable Disable QuickBooks Messenger?
Internal communication applications such as Windows Live, Yahoo! Messenger, Skype, etc., are gaining popularity with each passing day. Similar to these messaging platforms, QuickBooks messenger is one such secured messaging app that facilitates QuickBooks users to communicate with each other in a secure working environment. It will be appropriate to say, that these messaging apps have increased the working efficiency of the workforce.
Let’s understand what QuickBooks Messenger is and how this new utility tool is being used by users around the world.
What is QuickBooks Messenger?
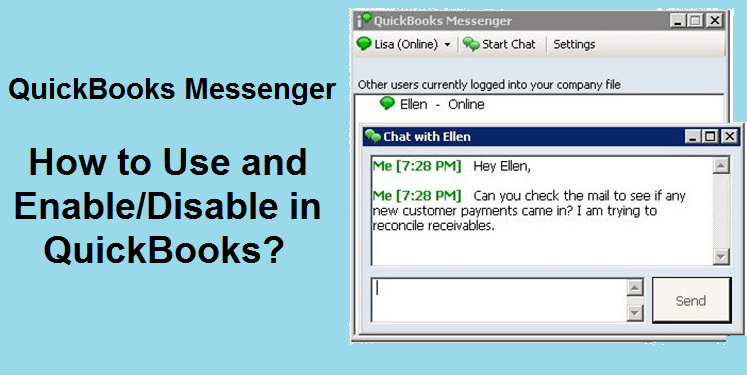
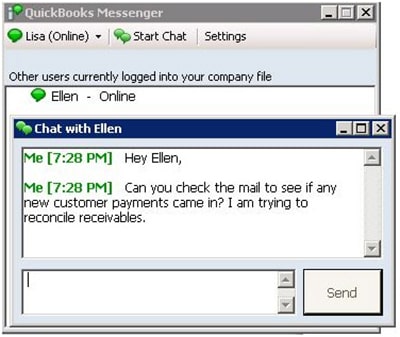
QuickBooks Messenger is a messaging utility tool to streamline the internal communication process between QuickBooks users. It is available on QuickBooks desktop in multi-user mode and enables users to use the same company file on a server to chat without any hassle. Here users can chat with an individual or in a group.
In the further sections of this blog, let’s understand how to enable or disable QuickBooks messenger according to your needs.
How to use QuickBooks Messenger?
The development team at Intuit ensures that their application is easy to use for the users. Therefore, they make it less complex and easy to understand.
Below we have enlisted the step-by-step guide to enable QuickBooks messenger or disable it as per your preference. Follow the steps given below to get started with QuickBooks messenger. Or you can connect with the support team to get instant help related to the application.
Steps to Enable QuickBooks Messenger
QuickBooks messenger tool is enabled automatically whenever a user login. However, the user needs to double tap on the QB messenger icon shown in the system tray at the bottom of the screen whenever they want to use it.
Use QuickBooks Messaging app to chat with other users
- Whenever a new user login to the company file, everyone else using the company file gets notified. They can simply use QuickBooks messenger to start the chat with the user.
- Alternatively, users can right-click on the QuickBooks messenger icon in the system tray and click on chat to message another user.
- Additional benefits to admins:
-
- Admins can send messages to all the logged-in users at once using the ‘send message to logged-in users’ option provided under ‘Actions’.
- Limitations for admins:
-
- An admin can not read the conversation between two users logged in to the company file.
Different user status
Users can also set the status of their availability and show others when they are available to chat and when they are busy. Some of the options available to them are busy, away, in a meeting, online, etc.
Steps to Log off or Close Company File
Only an admin can log off other users or close the QuickBooks company file. Here’s how it is done.
- Open QuickBooks messenger by clicking on the ‘chat with a co-worker’ option.
- Next, ‘close company file’ for the users by selecting the option from the Actions drop-down.
- Now, click on the user for whom you want to close the company file as an admin.
- Now, close the company file and confirm by clicking on the ‘Yes’ button.
Steps to Disable QuickBooks messenger
Follow the step-by-step instructions enlisted below to disable QuickBooks messenger.
- First, Sign in yourself as an admin in multi-user mode and click on File Tab.
- Under this option, go down and you will find the ‘Utilities’ option.
- In the new tab, click on the ‘Disable QuickBooks Messenger’ option.
- Complete the process by logging out of the company file. To check the effect, log in again.
By this time, you must have learned how QuickBooks messenger works and how you can use it to increase your efficiency at work.
There are many users that are continuously using the messaging app at work. They often encounter their QuickBooks messenger not working. So, if this is the case with you, it is important to know how you can fix the issue in no time.
Causes of QuickBooks Messenger not Working
Numerous possible reasons can cause the occurrence of QuickBooks messenger not working error. Some of the most common ones are given below.
- Corrupt or damaged Windows OS
- Missing or corrupt QBWUSER.INI file
- Improper company file name
- Issues with the hard drive
Solutions to Fix QuickBooks Messenger not Working
The solutions given below are tried and tested by experts to resolve the QuickBooks messenger not working issue. So, if you are frustrated because of this issue, here’s how you can fix it.
Solution 1: Use QuickBooks Tool Hub
- Close the QuickBooks application from Task Manager
- Next, Download and install QuickBooks Tool Hub from the official Intuit website on your system.
- After successful installation, launch the tool by double-clicking on its icon.
- Now go to the Program Problems tab followed by clicking on the ‘Quick Fix my Program’ option.
Once the process is completed, try to use the messenger again and if the problem persists, move to the next possible solution.
Solution 2: Create a new QBWUSER.INI file
- First, go to My Computer.
- Click on the View tab
- Under this, click on Advanced settings.
- Find ‘Hidden files and folder option’ and click on the ‘Show Hidden Files and Folders’ option.
- Now go to your C: drive and rename the QBWUSER.INI file.
Immediately after this when you launch QuickBooks again, it will create a new QBWUSER.INI file. Hope this resolves your issue. Else, move to the next possible solution.
Solution 3: Provide administrator rights
- Click on the Start menu and open the ‘Windows Small Business Server’ from the All Programs list
- Click on the ‘Users and Groups’ section in the Windows SBS Console
- Select the ‘Add a new user account’ option and enter all the required details asked for
- Provide administration rights to the account and then click on ‘Finish’
- Open the ‘Control Panel’ and navigate to the ‘User Accounts’ option
- Search for QBDataServiceUserXX for your respective QuickBooks Desktop software version
- Select the ‘Change the Account type’ option and choose the ‘Administrator’ option
- For saving the changes click on ‘Change Account Type’ and then click on ‘Apply’
See Also: How to Use QuickBooks Scan Manager?
Wrapping Up:
By this time you must have learned all about QuickBooks messenger from the article given above. If you still face difficulty while enabling or disabling QB messenger or stopped working, you can reach the experts instantly. Simply, call on QuickBooks Customer Service or chat with them to get an instant solution for your problem.